Animal-Based Ice Cream Bars
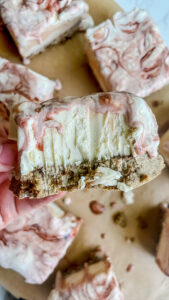
These animal-based ice cream bars have a beef-plantain-date-sea salt crust that is topped with raw milk ice cream and date syrup.
Tried this recipe?Mention @ashrothstein or tag #asheats!
Ingredients
For the crust:
- 1 cup Carnivore Crisps beef flour (ASHLEYR for 10% off) or dehydrated ground beef – see this recipe for instructions
- 1 cup plantain flour
- 4 large Medjool dates
- 1 cup raw milk
- few dashes sea salt (ASHLEYR for 15% off)
For the bars:
- 1 batch (about 4 cups) raw milk ice cream (I used raw cream instead of the raw milk cream top when I made the ice cream for this recipe; I also used 1/2 cup maple syrup instead of the dates)
For the topping (optional)*
- date syrup
- *I used date syrup on top because I was going for a "galaxy swirl" design on the top of the bars. In doing this, the bars came out too sweet. Unless you want to recreate these bars exactly as shown, I would skip the date syrup. In its place, feel free to add any toppings you'd like, or just leave the toppings out.
Instructions
- If you’re interested solely in the recipe, skip this bullet point and keep on reading. For those interested in sourcing nutrient-dense food, low-toxic household products, and discounts on brands that may support your AB journey, you may find value in my product guides. Head over to this page if you’d like to check them out. All are free (and always will be).
- Note: If you liked this ice cream bars recipe, click here for more animal-based ice cream recipes.
- **Read the note under "Cut, serve, and enjoy" before starting.**
If a visual will help, watch the Instagram Reel for this recipe.
Make the raw milk ice cream.
- Follow this recipe here.
- Note: I used raw cream instead of the raw milk cream top when I made the ice cream for this recipe. I also used maple syrup instead of dates.
Make the crust.
- In your food processor, add the beef flour (ASHLEYR for 10% off), plantain flour, dates, and sea salt (ASHLEYR for 15% off).
- Note: if you go through tons of salt in your household like we do, check out this salt-purchasing hack that will save you money + make things more efficient. We started this last year, and I'm so happy we did!
- Blend until all ingredients are incorporated, then add the raw milk and blend until smooth. The crust dough should be pretty dry, but somewhat sticky.
Form the ice cream bars.
- Place a piece of parchment paper in your 8x8 baking dish, and add the crust dough.
- Press the crust dough down firmly until an even layer is formed across the baking dish. If you'd like a visual, check out the Instagram Reel for this recipe.
- Add the raw milk ice cream to the top of the crust and smooth it out into an even layer.
- Add any toppings you want to the top of the raw milk ice cream layer. Note: I used date syrup on top because I was going for a "galaxy swirl" design on the top of the bars. In doing this, the bars came out too sweet. Unless you want to recreate these bars exactly as shown, I would skip the date syrup.
Freeze the bars.
- Place the bars in your freezer for 24 hours+.
- Note: you may be able to get away with less, say 12 hours or so. You just want to make sure the mixture is firm before you chop it into bars.
Cut, serve, and enjoy.
- Once the mixture is done freezing, remove it from the freezer, take it out of the dish, peel the parchment paper away from the sides, and cut it into bars. I recommend 9 bars, but you can cut it into however many bars you want.
- Note: the crust was pretty tough to cut through. I had to use my cleaver (shown in the reel for this recipe) to cut through it. If you don't have a good chopping knife, I recommend cutting the crust ingredients in half. This will yield a much thinner crust and it will be easier to cut through.
- If there are leftovers, store them in an airtight container in the freezer for a few weeks. These ice cream bars are best enjoyed right out of the freezer as they can melt quickly, depending on the temperature of the air.