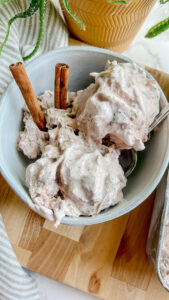
Apple Pie Raw Milk Ice Cream
This nutrient-dense apple pie raw milk ice cream was created to honor the transition from summer to Fall.
Tried this recipe?Mention @ashrothstein or tag #asheats!
Equipment
- Storage container for ice cream
Ingredients
- 3 cups raw milk*
- 1 cup raw cream*
- 1/2 cup date syrup
- 1-2 apples** (any will do; I used Granny Smith)
- 2 bags Carnivore Crisps Brisket Crumbs (ASHLEYR for 10% off - Ribeye Crumbs will also work too)
- 1 tbsp grass-fed ghee (or butter)
- 2 tbsp ceylon cinnamon
Instructions
- If you’re interested solely in the recipe, skip this bullet point and keep on reading. For those interested in sourcing nutrient-dense food, low-toxic household products, and discounts on brands that may support your AB journey, you may find value in my product guides. Head over to this page if you’d like to check them out. All are free (and always will be).
If a visual will help, watch the Instagram Reel for this recipe.
Prep work: 24 hours prior.
- *There are two ways to make this recipe: using raw milk only and using raw milk + raw cream. See the following steps for instructions for both options.
- If using raw milk only: Use 4 cups total. To prep the raw milk, leave it sitting (preferably a fresh, unopened container of raw milk) in your fridge for 24 hours prior to making the ice cream. The goal is to get the cream to accumulate at the top of the container, so when you pour out your 4 cups, it's mostly cream. There is a photo of this in the "Tips to make the best..." section above. And don't fret - some cream stays behind, so this method won't ruin the taste or texture of the remaining milk. Don't forget to freeze your ice cream maker bowl 24 hours in advance as well.
- If using raw milk + raw cream: follow the recipe as written.
- Note: I also placed my Carnivore Crisps Brisket Crumbs (ASHLEYR for 10% off in the fridge ahead of time so they would be cold when added to the ice cream. I don't think this is necessary, but it may preserve temperature which leads to less time required to freeze.
Sautee the apples.
- Chop the apples into small cubes, or however large you'd like the apple chunks in your ice cream to be. I left the skins on for color, but feel free to skin your apples if you prefer them that way. See this Instagram Reel for a visual.
- **Note: If you love chunky ice cream (think Ben & Jerry's), use 2 apples. If you don't love chunky ice cream, use 1 apple. If you're not sure, start with 1 apple. I used 2 apples and while I enjoyed the ice cream, it was a bit too chunky for me.
- Add the ghee to your cooking pan and bring to medium heat. Once the ghee is melted, add the chopped apples to the pan and coat with 1 tbsp Ceylon cinnamon.
- Mix around the apples in the pan until they're evenly coated with ghee and cinnamon.
- Bring to medium-high heat and cover. Stir occasionally (every 1-2 minutes) until the apples are soft, 8-10 minutes or so.
- Once the apples are done, set them aside to fully cool.
- Note: After a few minutes of cooling, I placed my apples in the freezer to help them cool even faster.
Make the ice cream batter.
- Pour the raw milk (remember, don't shake it!) or raw milk + raw cream (if you're using both) into the blender along with the date syrup, 1 tbsp Ceylon cinnamon, and sea salt (ASHLEYR for 15% off).
- Note: if you go through tons of salt in your household like we do, check out this salt-purchasing hack that will save you money + make things more efficient. We started this last year, and I'm so happy we did!
- Note: Because not everyone is crazy about the flavor of cinnamon, I created this recipe to have a mild cinnamon taste. If you love cinnamon and really want the flavor to come through, I'd add an additional tsp to the ice cream batter.
- Blend the batter until smooth.
Make the ice cream.
- Remove your ice cream maker bowl from your freezer, set up your ice cream maker, and turn it on so it begins to churn.
- Pour the ice cream batter into the machine.
- Once the ice cream maker has been running for about 5 minutes, pour your Carnivore Crisps Brisket Crumbs (ASHLEYR for 10% off - Ribeye Crumbs will also work too) right into the churning ice cream. For a visual, see the Instagram Reel for this recipe.
- Let the ice cream maker run for about 15 more minutes or so, or until the ice cream is thick and creamy.
Transfer the ice cream to your storage container and mix in the cooled apples.
- Once the ice cream is done, transfer it to your storage container. Add the cooled apples to the ice cream and mix well until they are fully incorporated.
Freeze, then serve and enjoy.
- Place the ice cream in the freezer to set for 1-2 hours+, then serve and enjoy!
- Store it in the freezer as you would regular ice cream (this is the container I use).
- Note: If you eat the ice cream right after it's finished churning, it will have a texture of soft serve. If you store it in the freezer for 1-2 hours, it has a wonderful creamy texture (similar to standard ice cream). If you store it for longer, you may have to thaw it out a bit before scooping it.