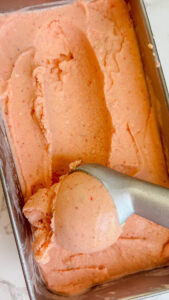
Raw Milk Sherbet
This refreshing animal-based friendly raw milk sherbet is made with just frozen fruit, raw milk, and raw cream.
Tried this recipe?Mention @ashrothstein or tag #asheats!
Equipment
- Storage container for ice cream (this is the one I used; here is another idea)
- Ice cream scooper
Ingredients
- 4 cups frozen fruit (I used a mango/strawberry/banana combo - would highly recommend!)
- 1/2 cup raw milk
- 1/4 cup raw cream (optional; if you do not have raw cream, sub this out with more raw milk)
Instructions
- If you’re interested solely in the recipe, skip this bullet point and keep on reading. For those interested in sourcing nutrient-dense food, low-toxic household products, and discounts on brands that may support your AB journey, you may find value in my product guides. Head over to this page if you’d like to check them out. All are free (and always will be).
If a visual will help, watch the Instagram Reel for this recipe.
- Fun fact: I was initially going to call this recipe a "sorbet," but I learned that sorbets are dairy-free and sherbets include dairy. Also, sherbets are much lighter than ice cream because they include mainly fruit and way less dairy.
Prep work:
- This step is optional, but I recommend freezing the serving bowls you plan to use (and possibly the spoons if you're eating it outside, for example) ahead of time. Using cold tools will help the sherbet last at room temperature longer.
Make the sherbet.
- In your food processor, add the frozen fruit, raw milk, and raw cream.
- Note: I used about 2 cups mango, 1.5 cups strawberries, and 1/2 cup bananas, but any combination of frozen fruit will do.
- Note: if you do not have access to raw cream, use 3/4 cup raw milk (total) instead.
- Blend on high until a smooth consistency is reached.
- Note: in the process of blending, you will have to stop the food processor several times and mix the fruit around. I had to stop mine at least 5-7 times. For a visual of this process, see the Instagram reel for this recipe. A blender would probably work if you don’t have a food processor, but it may be hard on the blender so operate at your own risk.
Freeze the sherbet.
- Once you're done blending the sherbet, add the mixture to your storage container then place it in the freezer.
Serve and enjoy.
- Note: my favorite texture of this sherbet is after it's been frozen for about 45-60 minutes. This is the texture you see in the main photo for this recipe - smooth and creamy. If you freeze the sherbet for a few hours or longer, it gets pretty firm (7th photo down on the main recipe page) and will require some thawing before scooping and serving.
