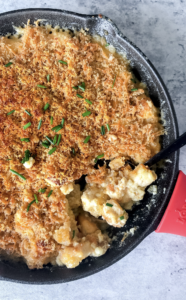
Carnivore Mac and Cheese
This Carnivore Mac and Cheese is creamy, decadent, zero carb, topped with crispy raw cheese-pork rind breadcrumbs, and garnished with (optional) chives.
Tried this recipe?Mention @ashrothstein or tag #asheats!
Equipment
- Blender or food processor
Ingredients
For the "breadcrumbs":
- 2.5 oz pork rinds (pre-ground)
- 2 oz raw cheese
For the "mac":
- 2 eggs
- 1 lb raw ground chicken
- grass-fed ghee (for pan-frying)
- sea salt, to taste (ASHLEYR for 15% off)
For the cheese sauce:
- 6 oz cheese
- 1 cup milk or cream
- 2 tsp yellow mustard (optional, but recommended)
- 1 tbsp fresh lemon juice (optional, but recommended)
- sea salt, to taste (ASHLEYR for 15% off)
Garnish:
- Chives (to taste - optional)
Instructions
- If you’re interested solely in the recipe, skip this bullet point and keep on reading. For those interested in sourcing nutrient-dense food, low-toxic household products, and discounts on brands that may support your AB journey, you may find value in my product guides. Head over to this page if you’d like to check them out. All are free (and always will be).
Make the "breadcrumbs".
- In your blender, blend the pork rinds down to a fine powder, then set the powder aside in a bowl.
- Cut 1/4 (2oz) off your 8oz block of cheese.
- In the same bowl with the pork rind powder, with your vegetable grater, finely shred the 2oz block of raw cheese.
- Mix the pork rind powder and shredded raw cheese around with your hands to get it to a uniform consistency, then set the mixture aside.
Make the "mac".
- Note: if you go through tons of salt in your household like we do, check out this salt purchasing hack that will save you money + make things more efficient. We started this last year, and I'm so happy we did!
- Pour the paste into your freezer bag (or large plastic bag) and zip it shut while removing the air and pushing the mixture down to one corner.
- Note: Act as if you're creating a tool to ice a cake. There are pictures under the "Tips to make the best..." section to demonstrate this for reference.
- Place 1-2 tbsp of ghee in your cooking pan, and bring to medium-high heat.
- Once the pan is hot, cut one of the corners of the plastic bag with your kitchen shears, creating a hole to squeeze out the mixture.
- Squeeze out nuggets of the chicken-egg mixture into the hot pan, and pan-fry them until golden brown. I did 1-2 minutes on each side, then kept flipping them until they turned the color I wanted.
- Note: There are pictures under the "Tips to make the best..." section to demonstrate this step for reference.
- You may have to add more ghee to the pan if it runs out before you're done pan-frying. Once the pieces are all done frying, place them in your 8" cast iron pan (or whatever baking dish you're using) and set it aside.
Make the cheese sauce.
- Preheat your oven to 400 degrees.
- Pour the milk (or cream) into your cooking pot, and bring it to a boil while stirring.
- Once the milk is boiling, slowly stir in the remaining (6oz) cheese.
- Once it's fully mixed, remove the sauce from heat.
Prepare the dish.
- Pour the cheese sauce over the mac. It may be watery. This is normal and it will thicken while baking.
- Note: There are pictures under the "Tips to make the best..." section to demonstrate what this looks like for reference.
- Top the Mac and Cheese with a thick layer of your breadcrumb mixture.
Bake the dish.
- Place the Mac and Cheese in the oven and bake at 400 degrees for 10 minutes.
Broil the dish.
- Near the end of the 10 minutes, set your oven to broil and watch it closely. Broil for 30-60 seconds, or until the breadcrumbs start to crisp up and brown. Don't set it and forget it at this step! It will burn fast if you don't pay attention.
- Once it's done broiling, remove the Mac and Cheese from the oven and allow it to cool for 10-15 minutes.
Garnish and serve.
- Garnish with freshly chopped chives (do not use if strict carnivore) or whatever you wish.
- This dish is best served and enjoyed fresh, although leftovers can be stored in the fridge in an airtight container for 2-3 days.